Tonight is the Lego EV3 Self-Driving Challenge Final. All teams get into final testing stage. Able to complete all task maybe is 50% of the work. We can fine tune the robot forever. Think about the real cars. People invented automobile for over 100 years. Every year, we still find new way to improve it. I hope all student can keep your curiosity, find new way to improve your creativity. Keep building.
Lego EV3 Self-driving Challenge
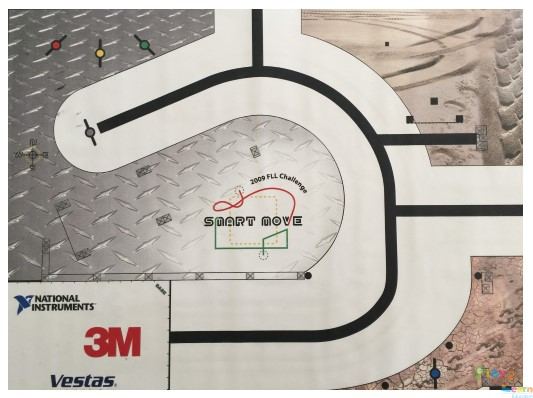
Welcome to the class seven. Class 7 and class 8 are combined to prepare the final challenge. The game rule is: the robot start from the home, follow the curved mountain road reach the top, looking for colorful goodies, pick one, then trace the same way home. Robot will earn 20 points to complete each task. After the race, we also judge the code by readable, comments, custom building blocks, and hope you save the project and program for future use. Two students make a team to take the challenge. They tried so hard, one team actually is able to finish all task within 2 minutes limit. Next week, we are looking for all team can finish the work and do a final show at the end. Thank you guys for helping out the class and cleaning after.
Lego EV3 Cruise Control
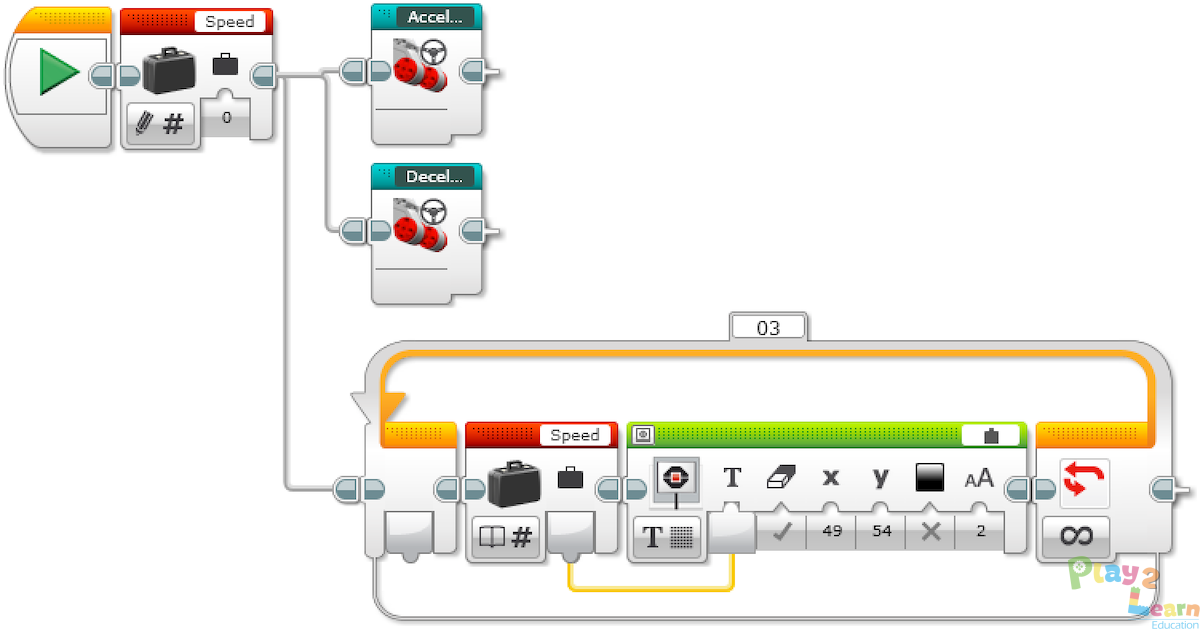
Welcome back the sixth class for this season. Today we are working on cruise controller. The main task is to send speed command by pressing the touch sensors. Left one for accelerate the car, right one for decelerate the car. We can also display the speed on dashboard. We also introduced a very important concept, sub-routing(a program inside a program), in lego world, we call it “my building block”. The custom build blocks can help us reuse some of the code we built for the project. From now on, we can use lego pre-built blocks, or we can make our own. We used two in this class. For next two classes, we are going to use at least four blocks. There are no limits if you can build more functional blocks. We are going to introduce some simulated game rules. We will give scores if your robot can finish some tasks. Thank you again for your corporation.
Lego EV3 Motor Controller
Today is the second class. We jump right into the EV3 programming. We built a classic proportional–integral–derivative controller (PID controller) step by step. The PID controller is a control loop mechanism employing feedback that is widely used in industrial control systems and a variety of other applications requiring continuously modulated control. We are able to set the target position, the robot will follow, and move the arm to that position. Because we only made the p portion, the controller will shake at the setting point. We will continue to build the rest of the controller in the following classes. All students are great helper to clean up the room. Thank you and see you next class.
Lego EV3 Motor Controller
Welcome to the second class of Lego Challenge Level IV program. Today we are explored the powerful PID motor position controller. This controlling concept is used everyday in our life, such as elevator, CD player, fan, car steering etc. It is a little bit hard in the beginning. I will keep explain the concept and debug your program for next few classes. The final goal is to have some advanced technology for real world engineering challenges.
Intro to Lego Mindstorm EV3 and build color reader robot
Today is the first class of the eight Lego robotic programming classes. All student are excited about building the advanced Lego robots. We achieved two goals: Assemble the Lego car with two wheel drive, and taste of the color reading program. The students learned the fundamental programming loop, switch, and functional modules. They are hooked to the robot. In the next class, I will continue the exercise to make sure each student build their own color reading robot.
Communication ECA Phase IV Class 7: Roaming Vehicles 20181024
This lesson will focus on arrays and how they can be used to control the actions of the students’ wheeled robots. Students will discover what arrays are, how they work, and why they are important in computer programming. They will also learn how to incorporate an array into their program.
The students are going to program their robot to move according to a recorded set of instructions given to it through the buttons on the EV3 Brick according to these parameters:
Program 1: Recording One Action to Make the Robot Move
- Start the program.
- Create a Variable Block called “Drive”.
- Wait for a Brick Button to be bumped.
- Play sound “Click 2”.
- Record the numerical value of the pressed button in the variable “Drive”.
- Wait for 2 seconds.
- Play sound “G02”.
- Read the number stored in variable “Drive” and send the value to a switch.
- Numeric switch:
- If Drive = 1, curve turn the robot left.
- If Drive = 3, curve turn the robot right.
- If Drive = 4, move the robot straight forward for 2 rotations of the wheels.
- If Drive = 5, move the robot straight backward for 2 rotations of the wheels.
- Play sound “Game Over 2”.
Program 2: Recording Several Actions to Make the Robot Move (Optional)
The students will use the “array operations” and “Variable” blocks to realize a function to first recording several actions and then drive the robot.
In an Array Operations Block, record the button press in the Value parameter, loop number in the Index parameter and variable name in the Array parameter. Write all the information from the Array Operations Block into the “drive” Variable Block.
Communication ECA Phase IV Class 6: Cruise Control 20181017
During this lesson, the students gain a good understanding of the Variable Block. The students will use this information to create a cruise control feature for their wheeled robots. The students will utilize two Touch Sensors to control and maintain the speed of their robot. The students will need to program their robot so that, once moving, it can be sped up by pressing the Touch Sensor. Code blocks for controlling the Touch Sensor (wait) should be placed inside a loop.
The Variable Block is a programming block that can store data (text, logic, a numeric, or arrays), which can be overwritten at any time while the program is running. This block has to be read and then written to, using the Math, Text, or Array Operations Blocks.
Program 1: Increase Speed with Variable
- Start the program.
- Create a Variable Block called “Speed” and enter a value of 0.
- If the Touch Sensor is pressed:
- Read the variable called “Speed”
- Add 10 to the read value
- Write the result in the variable called “Speed”
- Read the variable called “Speed”
- Start motors B and C at a speed set to the value stored in the variable called “Speed”
- ELSE
- (Do nothing)
- Repeat steps 3a to 3e forever.
Program 2: Increase and Decrease Speed with Variable
With the first program written and the robot accelerating when the Touch Sensor is pressed, the students would extend the program to slow the robot down.
One solution could be to have a second unlimited loop similar to the loop used in the first programming exercise. This loop would use a different Touch Sensor port (another sensor added). The Math Block would be changed to subtract rather than add.
- Start the program.
- Create a Variable Block called “Speed”, enter a value of 0, and start two tasks.
TASK 1
- If Touch Sensor 1 is pressed:
- Read the variable called “Speed”
- Add 10 to the read value
- Write the result in the variable called “Speed”
- Read the variable called “Speed”
- Start motors B and C at a speed set to the value stored in the variable called “Speed”
ELSE
(Do nothing)
- Repeat steps 3a to 3e forever.
TASK 2
- If Touch Sensor 2 is pressed:
- Read the variable called “Speed”
- Subtract 10 from the read value
- Write the result in the variable called “Speed”
- Read the variable called “Speed”
- Start motors B and C at a speed set to the value stored in the variable called “Speed”
ELSE
(Do nothing)
- Repeat steps 5a to 5e forever.**
Program 3: Increase and Decrease Speed with Variable and Display
With the wheeled robot now accelerating and decelerating at the touch of a button (or two), students can extend their programming to show how fast their robots are moving. Students will use the Display Block to show this value in the Variable Block.
A new skill to be learned in this lesson is the creation of a My Block. Two of these can be seen in the solution below. My Blocks allow users to create subroutines of programs they have already written. In the case below, we have taken the acceleration and deceleration loops and created My Blocks from these programs. There are two reasons to do this: first to save space, and second to allow these subroutines to be reused in other programs.
- Start the program.
- Create a Variable Block called “Speed”, enter a value of 0, and start three tasks.
TASK 1
- Start My Block “Acceleration”.
TASK 2
- Start My Block “Deceleration”.
TASK 3
- Read the variable called “Speed”.
- Display the value stored in the variable called “Speed”.
- Repeat steps 5 and 6 forever.
Communication ECA Phase IV Class 5: Traffic Lights Detection and Point Turn 20181010
In this Lesson Part I, students will use the Color Sensor to make their wheeled robot move more autonomously in order to simulate how an autonomous car might respond to traffic lights. In Part II, the students’ mission is to program your robot to complete a point turn to an exact angle by using the Gyro Sensor.
Program 1: Red Light Detection
- Start the program.
- Start motors B and C (drive forward).
- Wait for the Color Sensor to detect the color red.
- Stop the motors.
Program 2: Turn your robot clockwise for 45 degrees
Rotating using a wheel is not very precise. If you try to turn your robot in the dust or on a slippery surface, it may not reach the right angle. What the Gyro Sensor does is to help you make much more precise movements.
- Move Tank
- Wait – Gyro Sensor – Compare Angle – Type [3] (Greater Than or Equal), Degrees [45]
- Move Tank – Off
Program 3: Red and Green Light Detection Loop
The “Loop” block will be used.
- Start the program.
- Start motors B and C (drive forward).
- Wait for the Color Sensor to detect the color red.
- Stop the motors.
- Wait for the Color Sensor to detect the color green.
- Repeat steps 2 to 5 forever.
Program 4: Line Following in Loop (Optional)
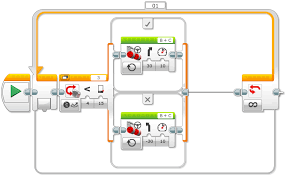
The students will create an automated, driverless vehicle that can follow a line. They will explore how an automated vehicle might be guided along a road or track. The “switch” block will be used, which works very similar to the “time” block who can control almost all sensors. The program will work best using black or blue tape on a very light (or white) surface.
- Start the program.
- Start motors B and C (drive forward with a curve toward the line).
- Wait for the Color Sensor to detect the color black.
- Start motors B and C (drive forward with a curve away from the line).
- Wait for the Color Sensor to detect the color white.
- Repeat steps 2 to 5 forever.
Communication ECA Phase IV Class 4: Driving Reversely 20181003
In this Lesson, students will use the Brick Status Light and Display Block to program their wheeled robot to simulate visual signals for pedestrians, other car drivers, and passengers when reversing. Students will also use the Touch Sensor to simulate forward and reverse gears. Touch Sensor can detect when the sensor’s red button has been pressed or released.
Program 1: Bump and Reverse
There are three different modes of the Touch Sensor, i.e., pressed, released, bumped (Pressed and Released Just Before).
- Start the Program.
- Drive forward in a straight line at the desired speed.
- Wait for the Touch Sensor (simulating changing to reverse gear) to be “bumped”.
- Stop the motors.
- Wait for 1 second.
- Activate the “reverse lights” (amber lights on EV3 Brick).
- Reverse direction of travel for 2 seconds。
Program 2: Bump, Wait for Reverse Gear
Introduce the use of the button on the EV3 Brick to act as the “reverse” gear.
- Start the program.
- Drive forward in a straight line at the desired speed.
- Wait for the Touch Sensor (simulating change to reverse gear) to be “bumped”.
- Stop the motors.
- Wait for the Brick Button (simulating change to reverse gear) to be pressed.
- Activate the “reverse lights” (amber lights on the EV3 Brick).
- Reverse the direction of travel for 2 seconds.


